


Thank you for your patience as pictures are loading.
Paver patio installation
Bob and I have a large backyard, filled with a lot of lawn area. For a myriad of reasons, we want to do our best in ridding ourselves of as much grass as possible (saves water, less to maintain, etc). We have a plan to add a circular patio around a tree in the middle of the back lawn, but thought we'd add a second square or rectangular patio off the end of the deck to familiarize ourselves with the process.
By familiarize, I mean figure out what the heck we were doing. Neither of us had attempted such a project before, nor seen it done. So, with the help from some do-it-yourself pages off the Internet, we began the prep work for the patio.
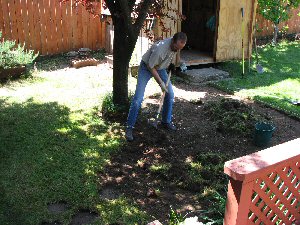
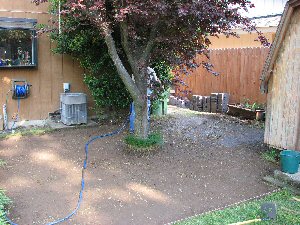
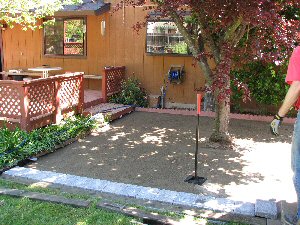
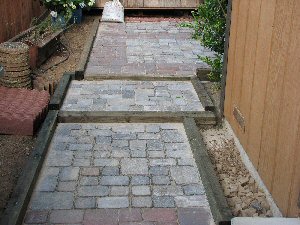
The first steps were removing approximately 350 square feet of lawn and tamping down the bare earth. From there, we laid landscaping fabric to protect the area from weeds, put in scalloped concrete edging along most of the edges and a pressure-treated 4x6 (held down by 2' long rebar stakes pounded through it) along the lawn edge. The next step was to fill the area with concrete sand. The sand allowed us to create a level surface. One-and-three-quarter tons of sand later (which had to be hauled from the driveway to the backyard by wheelbarrow), we were ready to start laying pavers.


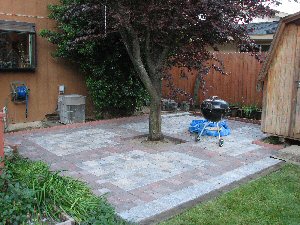
With the sand leveled and tamped down to help prevent shifting, Bob began laying out the pavers. We planned a red brick border, with a plus sign made up of the same red bricks in the middle to divide the patio into four quadrants. The middle of each quadrant would be filled with gray-to-rust colored cobblestones. Keep in mind that all we had to go by was a rough sketch Bob had drawn up. We hadn't found any photos remotely close to our intended pattern in our Internet searches. To make it even more difficult, we were using a mixture of 5x5, 5x8 and 8x11-inch pavers (which also had to be hauled by wheelbarrow). We were beginning to realize that our 'tester' project was quite ambitious!
While I was the designated hauler, Bob was definitely the one who laid the groundwork. Thankfully, Bob looked at it as a giant lego set and just started setting them in place. At the end of the day, we could start to see the patio pattern take form.
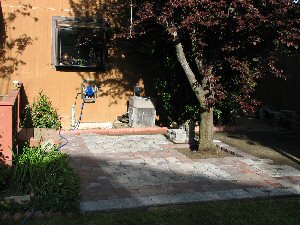
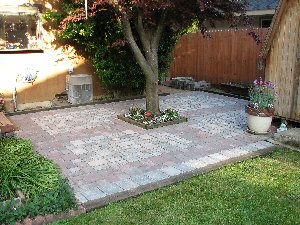
As we neared the far edges of the patio, we were happy to find that our border edges were within mere inches of the completed patio. We soon realized though that the scalloped concrete edging was not solid enough to prevent the outer pavers from shifting once we moved them in to dispel the gap. So back to the hardware store we went (we must have gone a dozen times during this endeavour) to get more 4x6's and rebar. Also added was a planter box around the existing tree for two reasons. One to secure the pavers placement, two to help fill in the bare area. Luckily there was an irrigation line already present, so we simply had to tap into it to water the newly planted flowers. We filled the cracks between the pavers with fine sand and we were looking like we were finished.
So far, so good, right? Being realistic (some say pessimitic), we were still waiting for the project disaster to rear it's ugly head. The next morning it did. We noticed an area that appeared wet and the fine sand fill was simply gone. Bob began walking across it and he described it later as walking on a waterbed. When pounding in the rebar for the last 4x6 at the edge of the deck step, one of the stakes had perfectly centered itself right through an irrigation line, filling the area under the landscape fabric with water.
Bob dug it up and re-routed the line around the rebar. The spot then had to be re-filled with earth, landscape fabric re-laid, and re-filled with sand and tamped. Then he had to re-lay the pavers, all the while trying to get the pattern correct. He managed to do so, but it was a day's worth of work that certainly hadn't been planned on!
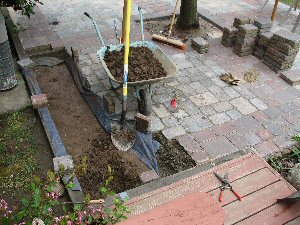
We had over-estimated the amount of pavers we needed and had quite a lot left over (we used 958 in the completed project). I sure wasn't looking forward to re-hauling them back to the driveway to return them to the hardware store! Instead Bob added to the scope of the original project and laid two steps down the south side of the house to rid ourselves of more ugly, no-use area and tie the patio into the existing concrete sidewalk. The small area between the walk and the house has since been filled completely with large, river rock (which whenever we dig, we also find we have an abundance of besides lawn).
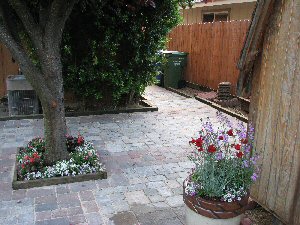
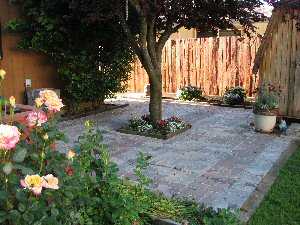
Ta-da! The completed patio! It has completely transformed this corner of the backyard from one we avoided to one we routinely barbeque on and enjoy. We're looking forward to when the fenceline hydrangeas grow into their own and help fill in that area. It was a ton (actually a few tons!) of hard work, but so worth it!
